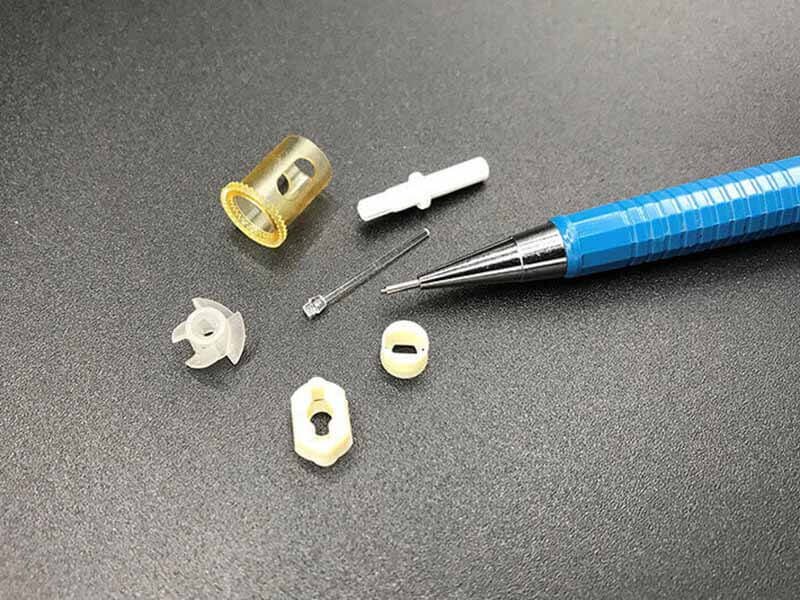
Injection molding defects are common issues that can significantly impact product quality, production efficiency, and overall costs. Defects like short shots, warping, and burn marks may lead to part rejection, rework, or scrapping—driving up operational expenses and causing delays. For manufacturers, understanding these plastic injection molding defects is vital to maintaining high standards of quality and efficiency.
In this guide, we identify the most prevalent injection molding quality defects and provide actionable injection molding defect solutions for each. By addressing these molding issues early on, manufacturers can enhance process reliability, reduce waste, and deliver higher-quality plastic components.
1. Short Shot
Short shots are one of the most common plastic injection molding defects, characterized by incomplete filling of the mold cavity. This defect occurs when the injected material does not fully occupy the mold, resulting in missing sections of the final product.

Causes of Short Shot
Insufficient Injection Pressure: If the pressure applied during injection is too low, it may not be enough to push the molten plastic completely into the mold.
Narrow Gates: Gates that are too small can restrict the flow of material, causing inadequate filling of the mold.
Low Material Temperature: If the plastic material is not heated sufficiently before injection, it may become too viscous to flow properly into all areas of the mold.
Solutions of Short Shot
Increase Injection Pressure: Adjusting the injection pressure settings can help ensure that enough force is applied to fill the mold completely.
Adjust Gate Design: Redesigning gates to be wider or more strategically placed can improve material flow and reduce the risk of short shots.
Raise Material Temperature: Ensuring that the plastic is heated to an appropriate temperature before injection can enhance its flow characteristics, allowing it to fill the mold more effectively.
Prevention Tips of Short Shot
Regularly Monitor Machine Settings: Consistent monitoring of injection pressure, temperature, and other critical machine settings can help identify potential issues before they lead to defects.
Conduct Flow Analysis: Utilizing simulation software to analyze flow patterns within the mold can provide insights into potential short shot occurrences and allow for design adjustments before production begins.
2. Warping
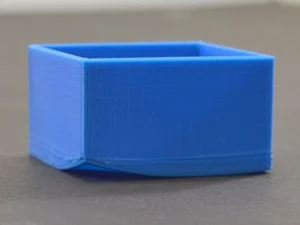
Warping is another prevalent issue in plastic injection molding defects, where the final product deforms or twists during the cooling process. This defect can lead to significant quality issues, affecting the fit and function of the molded parts.
Causes of Warping
Uneven Cooling Rates: If different areas of the mold cool at varying rates, it can cause stress within the material, leading to warping as it solidifies.
Excessive Temperature Differences in the Mold: Large temperature discrepancies between the mold and the injected material can exacerbate uneven cooling, resulting in distorted shapes.
Solutions of Warping
Optimize Cooling System Design: Implementing a well-designed cooling system that ensures even heat distribution can help mitigate warping. This includes strategically placing cooling channels within the mold to promote uniform cooling.
Maintain Consistent Mold Temperatures: According to Plastics Technology, consistent mold temperature is one of the most critical factors in reducing warpage defects.
Prevention Tips of Warping
Use Materials with Lower Warping Tendencies: Selecting plastics that are less prone to warping can significantly reduce this defect. Materials with better dimensional stability will maintain their shape more effectively during and after cooling.
Ensure Uniform Wall Thickness: Designing parts with consistent wall thickness minimizes the risk of uneven cooling, which is a primary contributor to warping. This design practice helps ensure that all areas of the part cool at similar rates, reducing internal stresses.
3. Burn Marks
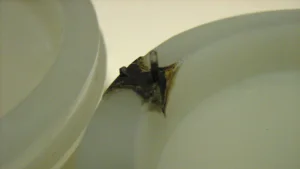
Burn marks are a common defect in plastic injection molding, characterized by dark spots or discoloration on the surface of molded parts. These marks can detract from the aesthetic quality of the product and may indicate underlying issues with the injection process.
Causes of Burn Marks
Trapped Air: When air is not adequately vented from the mold, it can become trapped during injection. This trapped air can lead to overheating as the molten resin compresses, resulting in burn marks on the surface of the part.
Overheating of the Resin: If the plastic material is subjected to excessive heat during injection, it can degrade, leading to discoloration and burn marks.
Solutions of Burn Marks
Improve Venting in the Mold: Enhancing the venting system within the mold allows trapped air to escape more efficiently, reducing the risk of burn marks. Properly designed vents help maintain consistent flow and prevent overheating.
Reduce Injection Speed and Pressure: Lowering the injection speed and pressure can help minimize turbulence and reduce the likelihood of overheating the resin. This adjustment allows for a smoother fill and less chance for air entrapment.
Prevention Tips of Burn Marks
Regularly Check Venting Systems: Conduct routine inspections of venting systems to ensure they are functioning properly. Any blockages or wear should be addressed promptly to maintain effective air escape.
Adjust Processing Parameters: Continuously monitor and adjust processing parameters such as temperature, pressure, and speed based on material specifications. Fine-tuning these settings can help prevent conditions that lead to burn marks.
4. Injection Molding Defects: Flash
Flash in plastic injection molding, characterized by excess material that seeps out of the mold cavity during the injection process. This results in thin, unwanted projections along the edges of the molded part, which can compromise both the aesthetic and functional quality of the product.

Causes of Flash
Insufficient Clamping Force: If the clamping force applied to the mold is not sufficient, it can allow molten plastic to escape from between the mold halves during injection, leading to flash.
Mold Misalignment: Misalignment of the mold halves can create gaps that permit material to leak out, resulting in flash on the finished part.
Solutions of Flash
Ensure Adequate Clamping Force: Adjusting the clamping force to meet or exceed the requirements for the specific part being produced is crucial. This ensures that the mold remains tightly closed during injection, preventing material from escaping.
Inspect and Repair Molds as Needed: Regular inspections of molds for wear, damage, or misalignment can help identify issues before they lead to flash. Any necessary repairs should be made promptly to maintain mold integrity.
Prevention Tips of Flash
Conduct Routine Maintenance on Clamping Mechanisms: Implementing a regular maintenance schedule for clamping mechanisms helps ensure they are functioning correctly. This includes checking for wear and tear, lubricating moving parts, and calibrating clamping pressure settings.
5. Sink Marks
Sink marks in injection molding, appearing as depressions or dimples on the surface of molded parts. These marks occur when the material shrinks unevenly during the cooling process, leading to aesthetic and structural issues.
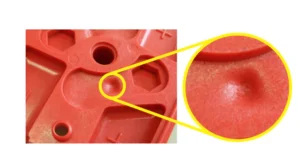
Causes of Sink Marks
Shrinkage of Material: During cooling, the material can shrink more in certain areas, particularly if there is insufficient holding pressure or if the cooling time is too short. This uneven shrinkage results in visible sink marks on the surface.
Low Holding Pressure: If the holding pressure applied during the injection process is inadequate, it may not counteract the natural shrinkage of the material, leading to surface defects.
Solutions of Sink Marks
Increase Holding Pressure and Cooling Time: Adjusting the holding pressure to a higher level can help maintain the shape of the part as it cools. Additionally, extending the cooling time allows for more uniform solidification, reducing the risk of sink marks.
Consider Using Fillers: Incorporating fillers into the plastic can help reduce shrinkage by increasing the overall density and stability of the material. This can lead to a more consistent surface finish and minimize sink marks.
Prevention Tips of Sink Marks
Design Parts with Uniform Thickness: Ensuring that parts have a uniform wall thickness is one of the most effective ways to minimize sink marks. This design practice promotes even cooling and reduces areas prone to shrinkage.
Conduct Regular Process Evaluations: Continuously monitor and evaluate injection molding processes to identify potential issues related to pressure and cooling. Adjustments can be made based on real-time data to enhance product quality.
6. Surface Delamination
Surface delamination is a defect in plastic injection molding characterized by the separation of layers in the molded part’s surface. This issue can lead to weak points in the product and can compromise both its structural integrity and aesthetic quality.
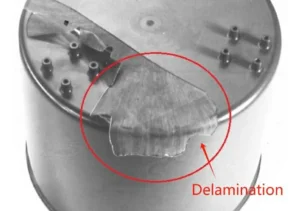
Causes of Surface Delamination
Incompatible Materials: Using materials that do not bond well with each other can lead to delamination. For example, mixing different types of plastics or additives without proper compatibility can result in weak adhesion between layers.
Moisture Contamination: Hygroscopic materials, which absorb moisture from the environment, can experience delamination if not properly dried before processing. Excess moisture can interfere with the bonding process during injection molding.
Solutions of Surface Delamination
Use Compatible Materials: Selecting materials that are known to be compatible with each other is crucial for preventing delamination. Conducting thorough research on material properties and compatibility before production can help ensure strong adhesion.
Ensure Proper Drying of Hygroscopic Materials: Implementing effective drying processes for hygroscopic materials is vital. Using desiccant dryers or hot air ovens to remove moisture before processing can significantly reduce the risk of delamination.
Prevention Tips of Surface Delamination
Implement Strict Material Handling Protocols: Establishing rigorous protocols for material handling can help prevent contamination and moisture absorption. This includes storing materials in airtight containers and maintaining a controlled environment to minimize exposure to humidity.
Conduct Regular Material Quality Checks: Regularly inspecting incoming materials for moisture content and compatibility can help identify potential issues before they affect production. Utilizing moisture analyzers and compatibility tests ensures that only suitable materials are used.
7. Weld Lines (Knit Lines)
Weld lines, also known as knit lines, are common defects in plastic injection molding that occur when two or more flow fronts of molten plastic meet and fail to fuse properly. This can lead to visible lines or weak spots in the final product, potentially compromising its structural integrity and aesthetic appeal.

Causes of Weld Lines (Knit Lines)
Poor Flow During Filling: When multiple flow fronts converge in the mold cavity, they may not blend seamlessly, resulting in weld lines. This often happens in complex geometries where the flow path is obstructed or inefficient.
Insufficient Material Temperature: If the material is not heated adequately before injection, it may become too viscous, hindering proper flow and fusion at the weld line.
Solutions of Weld Lines (Knit Lines)
Optimize Gate Placement: Strategically positioning gates can improve material flow and reduce the likelihood of weld lines. Gates should be placed to minimize the distance between flow fronts, allowing them to merge more effectively.
Increase Injection Speed: Raising the injection speed can enhance flow dynamics, allowing molten plastic to fill the mold more rapidly and reducing the chances of incomplete fusion at weld lines.
Prevention Tips of Weld Lines (Knit Lines)
Analyze Mold Design for Potential Flow Issues: Before production begins, conducting a thorough analysis of mold design can help identify potential flow problems. Utilizing simulation software can provide insights into how material will behave during injection, allowing for adjustments to be made proactively.
Consider Material Selection: Choosing materials with better flow characteristics can also help mitigate weld lines. Some plastics are designed to have improved flow properties, which can enhance fusion at junctions.
8. Injection Moulding Defects: Jetting
Jetting in plastic injection molding is a defect characterized by the formation of streaks or patterns on the surface of molded parts, often resembling a jet-like appearance. This defect occurs when the molten plastic flows too rapidly into the mold, creating turbulence that disrupts the smooth filling process.
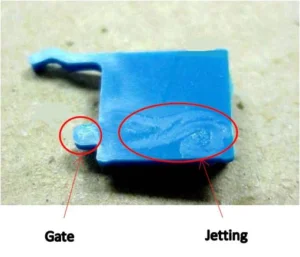
Causes of Jetting
Excessive Injection Speed: When the injection speed is too high, it can cause the molten plastic to flow rapidly into the mold, leading to turbulence. This turbulent flow can result in uneven filling and the formation of jetting defects.
Inadequate Material Temperature: If the material is not heated sufficiently, it may become too viscous, which can exacerbate flow issues and contribute to jetting.
Solutions of Jetting
Lower Injection Speed: Reducing the injection speed allows for a more controlled flow of molten plastic into the mold. This helps minimize turbulence and promotes smoother filling, reducing the likelihood of jetting.
Increase Material Temperature: Raising the temperature of the material prior to injection can improve its flow characteristics. A more fluid material is less likely to create turbulence during filling, which helps mitigate jetting.
Prevention Tips of Jetting
Conduct Flow Simulations During the Design Phase: Utilizing simulation software to analyze flow patterns during the design phase can help identify potential jetting issues before production begins. This proactive approach allows for adjustments in mold design and processing parameters to prevent defects.
Optimize Gate Design and Placement: Ensuring that gates are designed and positioned to facilitate smooth material flow can help reduce the risk of jetting. Properly designed gates allow for better control over how plastic enters the mold cavity.
9. Vacuum Voids
Vacuum voids are a defect in plastic injection molding characterized by the presence of air pockets trapped within the mold cavity during the filling process. These voids can lead to weak spots in the final product, compromising its structural integrity and potentially leading to failure in use.

Causes of Vacuum Voids
Trapped Air Pockets: During the injection process, if air is not allowed to escape from the mold cavity, it can become trapped as the molten plastic fills the space. This leads to the formation of vacuum voids within the molded part.
Inadequate Venting: Insufficient venting in the mold design can prevent air from escaping effectively, increasing the likelihood of vacuum voids.
Solutions of Vacuum Voids
Improve Venting Systems: Enhancing the venting system within the mold is critical for allowing trapped air to escape during injection. This may involve adding additional vents or optimizing existing vent locations to ensure effective air removal.
Redesign Mold to Facilitate Air Escape: Analyzing and redesigning the mold to promote better airflow can help minimize vacuum voids. This might include adjusting mold geometry or incorporating features that encourage air movement.
Prevention Tips of Vacuum Voids
Regularly Inspect Molds for Wear: Conduct routine inspections of molds to identify any wear or damage that may affect venting efficiency. Ensuring that vents are clear and functioning properly is crucial for preventing vacuum voids.
Use Simulation Tools: Employing simulation software during the design phase can help predict potential issues with air entrapment and allow for adjustments before production starts.
10. Discoloration
Discoloration is a common defect in plastic injection molding that manifests as unwanted color changes or streaks on the surface of molded parts. This issue can significantly affect the aesthetic appeal of products and may indicate underlying problems with the injection molding process.
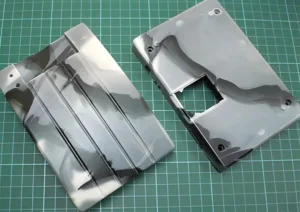
Causes of Discoloration
Material Degradation: Excessive heat during the injection process can lead to the degradation of plastic materials, resulting in discoloration. Overheating can break down polymer chains, causing changes in color and properties.
Contamination from Foreign Materials: The introduction of contaminants, such as dirt, dust, or residues from previous batches, can alter the color of the final product. Contaminated materials may not blend well during processing, leading to visible discoloration.
Solutions of Discoloration
Control Processing Temperatures: Maintaining appropriate processing temperatures is critical to preventing material degradation. Regularly monitoring temperature settings can help ensure that materials are not exposed to excessive heat during injection.
Ensure Clean Material Handling Practices: Implementing strict cleanliness protocols during material handling can minimize the risk of contamination. This includes using clean containers, tools, and equipment to prevent foreign materials from entering the production process.
Prevention Tips of Discoloration
Regularly Clean Equipment: Establishing a routine cleaning schedule for all equipment involved in the injection molding process helps prevent contamination and buildup of residues that could affect material quality.
Monitor Material Quality Before Use: Conducting thorough inspections of raw materials before processing can help identify any potential contaminants or quality issues. Ensuring that only high-quality materials are used will reduce the likelihood of discoloration.
11.Flow Lines (Flow Marks)
Flow marks, also known as flow lines, are surface imperfections that appear as wavy streaks or discoloration patterns on molded parts. These lines typically occur near gates or where the molten plastic changes direction inside the mold.

Causes of Flow Lines (Flow Marks)
Low Injection Speed: When the molten plastic flows too slowly, it may cool unevenly, leading to visible lines on the surface.
Low Material or Mold Temperature: If the material or the mold is not heated sufficiently, the plastic may solidify prematurely during flow.
Improper Gate Placement: Poor gate positioning can cause the material to change direction abruptly, increasing the chance of flow lines.
Solutions of Flow Lines (Flow Marks)
Increase Injection Speed: Speeding up the injection can help maintain a consistent flow and reduce premature cooling.
Raise Mold and Material Temperatures: Ensuring proper thermal settings improves material fluidity and surface finish.
Optimize Gate Design: Adjusting the gate location or size can allow smoother flow paths, minimizing direction changes and surface marks.
Prevention Tips of Flow Lines (Flow Marks)
Perform Mold Flow Simulations: Analyzing flow behavior in the early design stage helps predict and prevent flow-related defects.
Maintain Uniform Wall Thickness: Avoid sudden changes in part thickness that could alter flow speed and cause visible lines.
Use Proper Injection Profiles: Employing multi-stage injection with controlled velocity and pressure helps achieve smoother surfaces.
12.Splay (Silver Streaks)
Splay, sometimes referred to as silver streaks, appears as silvery lines or streaks on the surface of molded parts. This defect is most often caused by moisture or trapped gas in the resin.

Causes of Splay (Silver Streaks)
Moisture in the Material: Some plastic resins are highly hygroscopic, and insufficient drying before processing leads to splay.
Air or Gas Trapped in the Barrel: Air bubbles or decomposition gases can be introduced during the melting and injection stages.
Overheating of Material: Excessive heat can cause material degradation, releasing volatile gases that result in streaks.
Solutions of Splay (Silver Streaks)
Properly Dry the Resin: Pre-drying materials like ABS, PA, or PC can significantly reduce moisture-related splay.
Reduce Screw Back Pressure: Minimizing turbulence during plasticizing helps reduce air entrapment.
Optimize Barrel Temperature: Use appropriate temperature profiles to prevent overheating and thermal degradation.
Prevention Tips of Splay (Silver Streaks)
Use Desiccant Dryers: Especially for hygroscopic materials, using efficient drying equipment is essential before molding.
Regularly Clean Barrels and Screws: Build-up and contamination can lead to inconsistent melt quality and streaking.
Implement Vacuum Vents or Gas Vents: Improving mold venting can help gases escape before they affect the surface finish.
Conclusion
In conclusion, addressing injection molding defects is vital for maintaining high-quality standards in manufacturing. Common mold defects, such as short shots, warping, and discoloration, can significantly impact product quality and production efficiency. By understanding their causes and implementing effective solutions—such as optimizing mold design, controlling processing parameters, and ensuring proper material handling—manufacturers can minimize these issues.
Proactive measures, including regular equipment maintenance and thorough material inspections, are essential for preventing defects before they occur. By focusing on these best practices, manufacturers can enhance product quality, reduce waste, and improve overall operational efficiency, leading to greater customer satisfaction and success in the competitive landscape of injection molding.


