Injection molding process is a widely used manufacturing process and correctly injection molding process steps is crucial to optimize production and ensure quality. The injection molding processing consists of several key stages, each playing a vital role in the overall effectiveness of the operation. These steps include clamping, seating in, injecting molten plastic, holding pressure, cooling, and mold opening and ejection. By familiarizing oneself with these steps, one can better grasp what is injection moulding and how does injection molding work. Additionally, understanding the Plastic Injection Molding Stages helps in troubleshooting potential issues that may arise during production.
1. Clamping to Securely Close the Mold
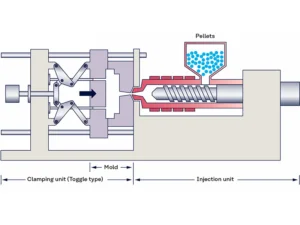
The first step in the Injection Molding Process Steps is clamping, which involves securely closing the mold to prepare for the injection of molten plastic. During this process, the lower mold, initially positioned on the injection molding machine, moves forward to tightly close against the upper mold. This creates a hollow cavity that will shape the final product. The injection molding machine exerts a significant clamping force to ensure that the two mold halves remain sealed, preventing any gaps from forming under the intense pressure of the injection phase.
Clamping is critical for maintaining mold integrity during injection. If the mold does not remain securely closed, molten plastic can leak out, leading to defects such as flash or incomplete parts. This secure closure is essential not only for product quality but also for safety during the injection molding processing. Proper clamping ensures that the dimensions of the molded parts are precise and consistent, which is vital for high-quality production.
Moreover, effective clamping directly impacts the overall efficiency of the injection molding cycle steps. By optimizing the clamping process—through appropriate force application and alignment—manufacturers can reduce cycle times and minimize rework due to defects. This efficiency contributes to a smoother operation and enhances productivity in the step-by-step injection molding process.
2. Seating In to Align the Mold Properly

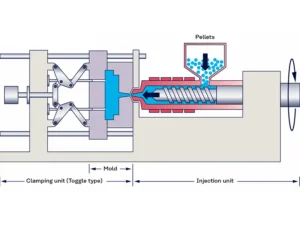
The second step in the injection molding process steps is the seating in process, which involves aligning the mold halves properly before injection. This step ensures that the two halves of the mold—the cavity and core—fit together accurately. Proper seating allows for optimal alignment of the mold components. When injection molds are aligned correctly, the molten plastic flows evenly into the cavity, producing high-quality, uniform parts.
Misalignment can lead to several issues, such as flash (excess material), uneven filling, under-injection, and potential damage to both the mold and the injection molding machine.
In addition to affecting product quality, proper alignment during the seating process also impacts the efficiency of the entire injection molding cycle. When molds are correctly seated, it minimizes cycle times and reduces the likelihood of defects, which can lead to costly rework or production delays.
To achieve accurate mold alignment, various components such as guide pins and bushings are utilized. These elements help ensure that the mold halves remain in their intended positions throughout the injection process, contributing to a successful molding process for plastic parts.
3. Injection of Molten Plastic into the Mold Cavity
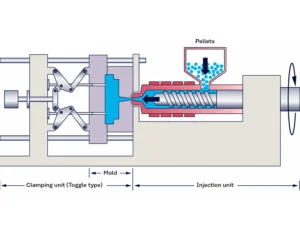
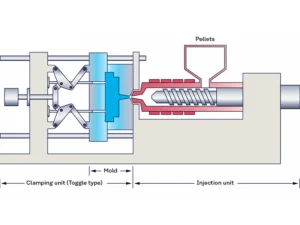
During this process, plastic pellets are fed into a heated barrel where they are melted down into a viscous liquid. A motorized screw or ram then pushes this molten plastic through a nozzle and into the mold cavity at high pressure.
In the injetion phase, controlling temperature and pressure is vital for ensuring the quality of the final product. The temperature affects the viscosity of the molten plastic; if it is too low, the material may not fill the mold completely, leading to defects such as sink marks or warping. Conversely, if the temperature is too high, it can cause degradation or discoloration of the material.
Injection pressure also plays a crucial role in this step. It controls the flow rate of the molten plastic into the mold cavity. Insufficient pressure can result in incomplete filling, leaving voids or air pockets that compromise structural integrity. On the other hand, excessive pressure may lead to overpacking, which can distort the molded part or damage the mold itself.
4. Holding Pressure to Compensate for Material Shrinkage
After the molten plastic has been injected into the mold cavity, it begins to cool and shrink. Holding pressure is applied to maintain the pressure within the mold during this cooling phase, compensating for the shrinkage that occurs as the material solidifies.
Holding pressure prevents backflow of the molten resin, which could lead to incomplete filling and defects like short shots or sink marks. By maintaining pressure, the screw continues to push additional material into the cavity to fill any gaps created by shrinkage. This ensures that the final product maintains its intended shape and dimensions.
If holding pressure is set too low, it can lead to excessive shrinkage and dimensional instability, while too high a setting may cause issues such as flash or warping. Therefore, finding the right balance in holding pressure settings is essential for maintaining quality throughout the plastic injection molding stages.
5. Cooling to Solidify the Plastic
This phase involves transferring heat away from the molten plastic to allow it to solidify within the mold. Effective cooling methods directly influence the dimensional accuracy and surface finish of the molded parts. The cooling phase accounts for approximately 60% to 80% of the entire injection molding cycle. If the cooling process is not executed correctly, it can lead to defects such as warping, shrinkage, or poor surface finishes. A well-designed cooling system not only shortens cycle times but also improves production rates and reduces costs, making it a critical aspect of the plastic injection molding stages.
Two Primary Cooling Methods
Conformal cooling channels are designed to follow the contours of the molded part closely, allowing for precise control over temperature distribution. This method significantly enhances heat removal efficiency and minimizes warping or distortion of the final product.
Effective cooling channels, while not as precise, are more cost-effective and can still provide adequate cooling when properly designed.
6. Mold Opening and Ejection to Release the Finished Part

Once the cooling phase is complete and the plastic has solidified, the mold opens to allow for the removal of the molded component. This process typically involves the separation of the two halves of the mold, with the lower mold moving backward while the upper mold remains stationary. As the mold separates, an ejection system is activated to push the finished part out of the cavity. Ejector pins are commonly used in this phase; they are positioned strategically within the mold to apply even force on the part, ensuring that it is removed without damage. The ejection system can utilize various mechanisms, including mechanical, pneumatic, or hybrid systems, to effectively push or pull the molded part from the cavity.
If parts are not ejected properly, they can become stuck in the mold due to factors such as shrinkage or intricate geometries. This can lead to deformities or breakage during removal. A well-designed ejection system minimizes these risks by applying controlled and even force during ejection. It also accommodates complex part designs, ensuring that components with undercuts or intricate features are released smoothly without compromising their integrity.
Conclusion of Injection Molding Process Steps
The injection molding process steps consist of six key stages. Each of these stages plays a vital role in ensuring that the final product meets quality standards and is produced efficiently. Understanding these steps not only enhances knowledge of how does injection molding work, but also empowers manufacturers to optimize their processes, reduce defects, and improve overall productivity. If you have further questions or would like to learn more about injection molding services, please feel free to reach out. We are here to help you navigate the complexities of injection molding and assist you in achieving your manufacturing goals!