Injection molding splay marks are a common molding defect that can compromise both the visual appeal and structural integrity of plastic parts. These injection molding silver streaks often result from moisture contamination, improper material preparation, or flawed processing conditions. Understanding what causes splay in injection molding is essential for maintaining high-quality production. From optimizing material drying to refining injection parameters and mold design, this article explores effective strategies to fix and prevent splay defects, ensuring smooth, defect-free plastic components.
What is Injection Molding Splay Marks?
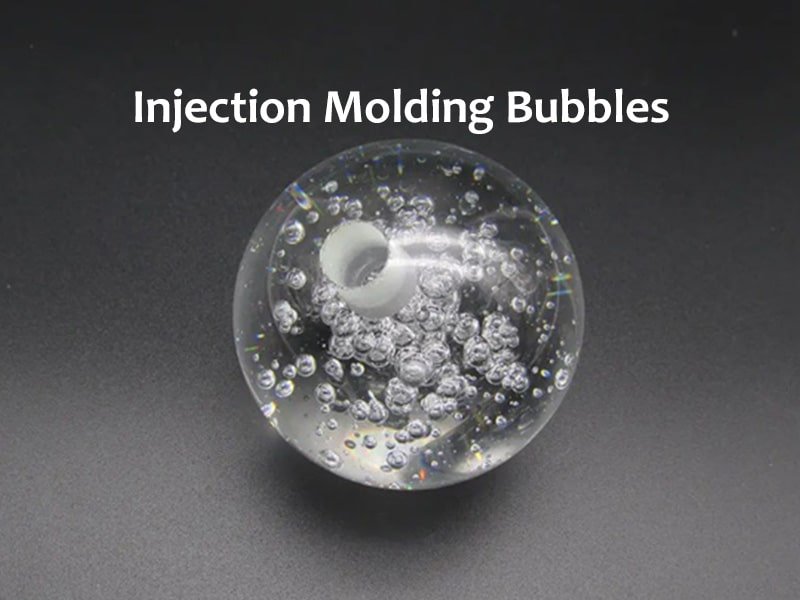
Injection molding splay marks, often called silver streaks, are a common defect in plastic parts produced through injection molding. Splay defects are often seen as streak-like patterns on the surface of molded plastic, with varying colors, from faint silver streaks to darker, more noticeable lines. These streaks arise when the plastic material has difficulty flowing evenly into the mold cavity, often due to factors like excess moisture in the resin or incorrect mold temperatures. The reflective quality of these marks—sometimes referred to as “silver streaks”—can make them particularly visible under direct lighting, affecting the overall visual quality of the molded part.

What Causes Splay in Injection Molding?
Injection molding splay marks can be traced back to various factors, primarily stemming from the materials used, the injection molding process itself, and the design and condition of the injection mold. Below, we explore these causes from three critical perspectives: materials, injection molding process, and injection mold design.
Moisture Content in Plastic Resins
Many plastics, especially hygroscopic materials like nylon, absorb moisture from the surrounding environment. When these materials are injected into the mold without proper drying, the trapped water vapor can turn into steam under the heat of the molten plastic. This causes air bubbles and creates the telltale streaks or silver marks on the molded surface.
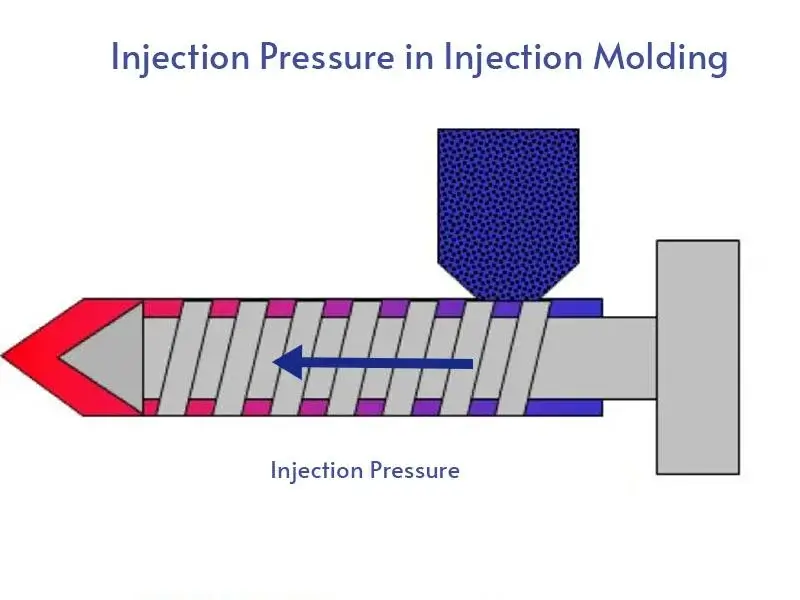
Excessive Injection Speed or Pressure
If either the injection speed or pressure is too high, the molten material can cause turbulent flow, leading to air entrapment within the cavity. This air may escape too slowly, leaving behind surface defects such as splay marks.
Incorrect Melt Temperature
If the material is injected into the mold at too high or too low of a temperature, it may not flow evenly, which increases the likelihood of splay defects. Too high a temperature may also cause excessive degradation of the plastic, leading to unsightly streaks on the surface.
Rapid Cooling or Cooling Rate Variations
Rapid cooling can cause uneven shrinkage, leading to the formation of splay marks. Inconsistent cooling rates across the mold can also create variations in the surface texture, leading to unwanted visual imperfections.
Poor Injection Timing or Packing Pressure
Improper injection timing, such as an insufficient or excessive packing pressure during the molding process, can prevent the plastic from fully filling the mold cavity. This can lead to incomplete filling, air pockets, and splay marks on the part surface. The packing pressure also helps to maintain consistent surface quality by ensuring the plastic remains evenly distributed throughout the mold cavity.
Inconsistent Mold Temperature
If the mold temperature fluctuates too much, the molten plastic may not cool evenly, causing unwanted surface features such as splay marks. A uniform mold temperature helps maintain consistent plastic flow and prevents the formation of air pockets that cause these defects.
Inadequate Venting or Vent Location Issues
Molds rely on venting systems to allow the escape of trapped air during the injection process. If the venting system is poorly designed or if vents are incorrectly placed, air can become trapped inside the mold, leading to air pockets that cause splay. Proper venting ensures that the air can escape efficiently without causing surface defects.

Poorly Designed Gates or Runner Systems
The gates and runner systems in an injection mold are responsible for directing the flow of molten plastic into the mold cavity. If these systems are poorly designed or blocked, it can cause irregular flow patterns, air entrapment, or insufficient filling, resulting in splay marks. Properly sized and positioned gates and runners are essential for achieving a smooth flow of material into the mold without causing defects.

How to Fix Existing Injection Molding Splay Marks?
Unlike preventive measures, which focus on avoiding defects during production, fixing existing splay defects requires reworking the affected parts or modifying the molding process. Here are several effective strategies to address splay defects in molded plastic parts.
1. Surface Treatment and Finishing Techniques
- Polishing and Buffing: Light splay marks on the surface can sometimes be removed using polishing or buffing tools to smooth out imperfections.
- Flame Treatment: Briefly exposing the part to a controlled flame can slightly melt the outermost surface, blending in the splay defects.
- Painting or Coating: If the plastic part allows for it, applying a paint or protective coating can hide the streaks while improving durability.
- Vapor Polishing: Certain thermoplastics, like polycarbonate, can undergo vapor polishing, where a chemical vapor smooths out defects.
2. Annealing or Heat Treatment
- Controlled Heating: Slowly heating the part in an oven at a specific temperature (below its melting point) can help redistribute polymer chains and reduce visible splay streaks.
- Infrared Heating: Using infrared heaters can locally smooth out splay marks without affecting the entire part.
3. Mechanical Rework and Part Modification
- Machining or Trimming: Removing a thin layer from the affected areas through CNC machining or manual trimming can eliminate minor splay marks.
- Surface Texturing: Sandblasting or adding a textured finish can help hide splay marks by breaking up the defect pattern.
4. Chemical Treatment
- Solvent Smoothing: Applying a solvent that slightly dissolves the outermost layer of plastic can remove or reduce the appearance of splay marks. This works well for materials like ABS and acrylics.
- Chemical Etching: Some engineering plastics can be treated with mild chemical etchants to even out the surface.
5. Recycling and Reprocessing Defective Parts
- Grinding and Regranulation: Defective parts can be shredded into plastic granules and mixed with virgin material for remolding.
- Material Drying Before Reuse: If moisture was the cause of splay marks, thoroughly drying the reprocessed plastic before reuse can prevent defects in the next molding cycle.
How to Prevent Splay marks in Injection Molding?
Preventing injection molding splay marks requires a proactive approach in material handling, process optimization, and mold design. By addressing key factors, manufacturers can minimize defects and enhance part quality.
1. Properly Drying Materials Before Injection
- Use Proper Drying Equipment: Employ desiccant dryers or vacuum dryers to remove moisture from hygroscopic plastics like ABS, nylon, and PET.
- Monitor Drying Conditions: Maintain appropriate drying time, temperature, and airflow based on resin specifications.
- Use Moisture Analyzers: Regularly test resin moisture levels before processing to prevent silver streaks injection molding.
2. Optimizing Injection Speed, Pressure, and Melt Temperature
- Avoid Excessive Injection Speed & Pressure: High velocity can introduce trapped air, leading to splay defects. Adjust parameters for smooth, controlled flow.
- Maintain Proper Melt Temperature: Overheating can degrade polymers, while underheating causes incomplete melting, both of which contribute to splay.
- Ensure Uniform Packing & Holding Pressure: Prevents gas entrapment and ensures consistent material distribution.
3. Maintaining Consistent and Appropriate Mold Temperatures
- Use Temperature-Controlled Molds: Proper thermal regulation reduces rapid cooling inconsistencies that contribute to splay in plastic injection molding.
- Prevent Cold Spots: Uneven cooling can cause moisture condensation, leading to streaks. Optimize coolant channels for uniform temperature distribution.
- Monitor Mold Surface Temperature: Use infrared sensors or thermocouples to maintain stable conditions.
4. Improving Mold Design with Better Venting and Gate Placements
- Enhance Mold Venting: Proper vent locations and sizes help expel trapped gases, preventing splay defect injection molding issues.
- Optimize Gate and Runner Design: Strategically placed gates and balanced runner systems improve material flow, reducing air pockets.
- Use Gas-Assisted Molding (If Applicable): Helps prevent air entrapment and improves surface quality in complex parts.
Conclusion
Splay marks in injection molding result from moisture, improper process settings, or poor mold design, affecting both appearance and structural integrity. Preventing these defects requires proper material drying, optimized injection parameters, consistent mold temperature, and improved mold design. Regular maintenance and process monitoring further ensure defect-free production, enhancing product quality and manufacturing efficiency.